All the charm of the old often lies in its plasterboard ceiling, this traditional structure that tells the story of our homes. At La Maison Coloniale, we love this marriage of authenticity and character that these period architectural elements confer. But when the time comes to renovate a plasterboard ceiling, the questions are pouring in! How can you preserve their charm while modernizing them? Which techniques should you use for a lasting and aesthetic result? Here are our tips for bringing these historic plasterboard ceilings back to life.
Our article in brief:
There renovation of a plasterboard ceiling combines preservation of old-world charm with modern techniques adapted to current needs. Here are the steps to follow to renovate a plasterboard ceiling :
- Carefully examine cracks, wet areas and loose parts before any intervention on your plasterboard ceiling.
- Several techniques are available: Suspended false ceiling, stretched membrane or direct cladding depending on the condition of the support.
- Take advantage of the work on your lath ceiling to improve the thermal and acoustic comfort of your interior.
- Choose the method that respects the architectural character while meeting modern requirements.
In this article
Understanding the characteristics and problems of plasterboard ceilings
Composition and traditional structure of lath ceilings
A plasterboard ceiling, also called " bacula" , is a true witness of the old-fashioned craftsmanship. This traditional solid wood structure consists of thin slats nailed side by side directly under the joists, then covered with several layers of plaster. Very common in buildings before 1945, these lathed ceilings have a variable thickness between 3 and 5 centimeters.
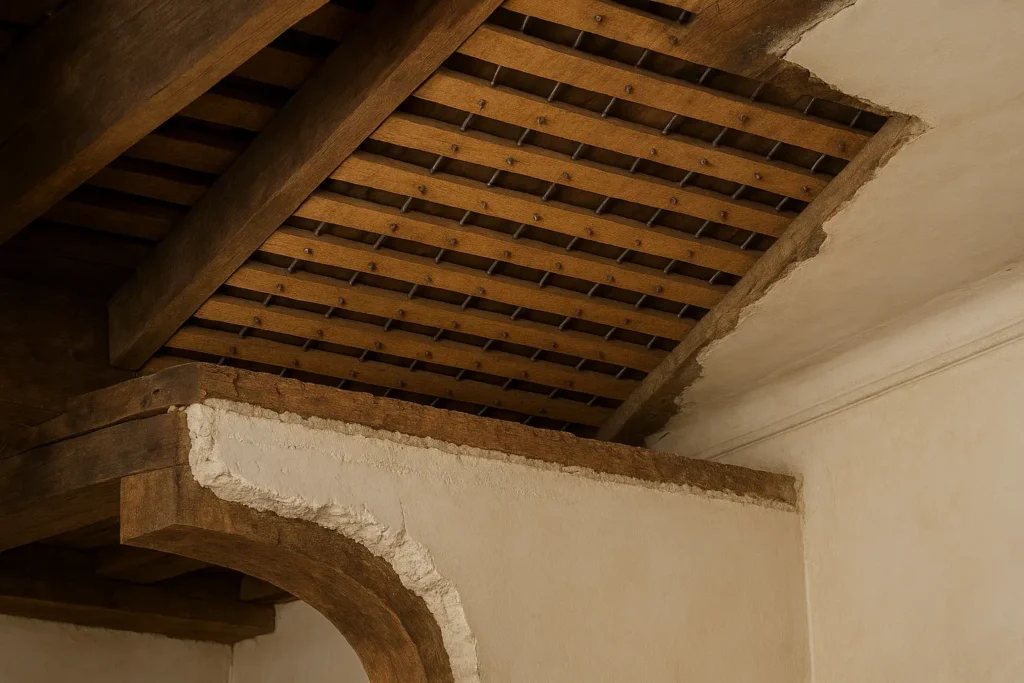
One of the qualities of these plasterboard ceilings, it's their excellent fire-resistant properties. A bacula A 5 cm ceiling offers a fire resistance of 2 hours, while a 3 cm ceiling guarantees protection for one hour. But be careful, this type of construction weighs between 40 and 60 kg/m², which is much more than modern ceilings. This explains certain structural problems over time.
Common damage to plasterboard ceilings
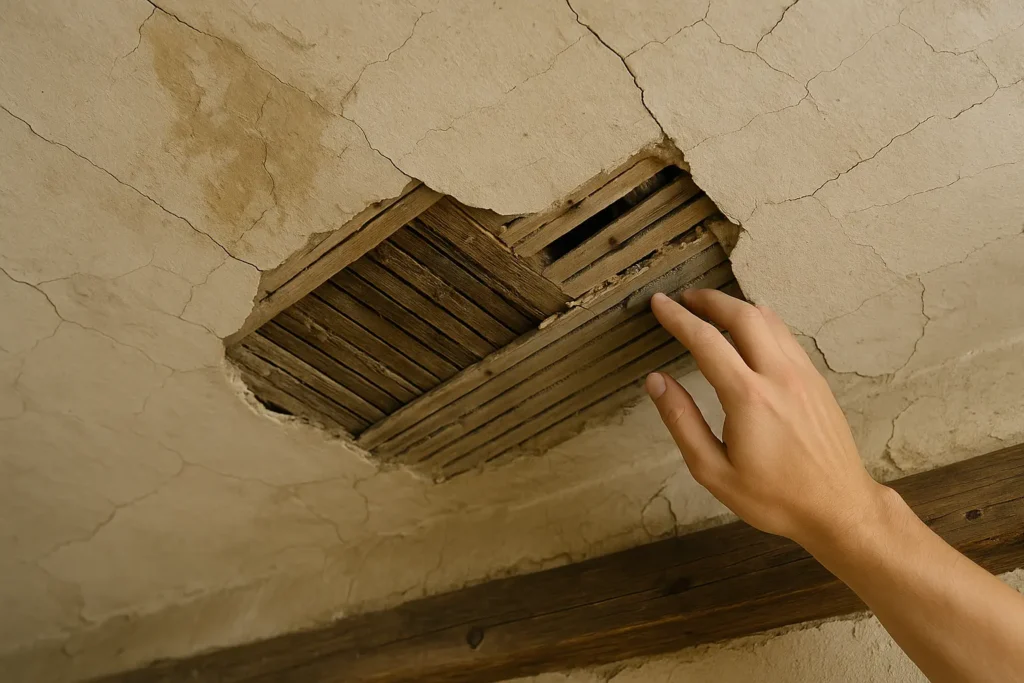
Over the years, these noble materials undergo various degradations. The plaster layer tends to crack, which creates a network of more or less significant fissures. Humidity is one of the main enemies of plasterboard ceiling, which causes localized subsidence and weakens the entire structure.
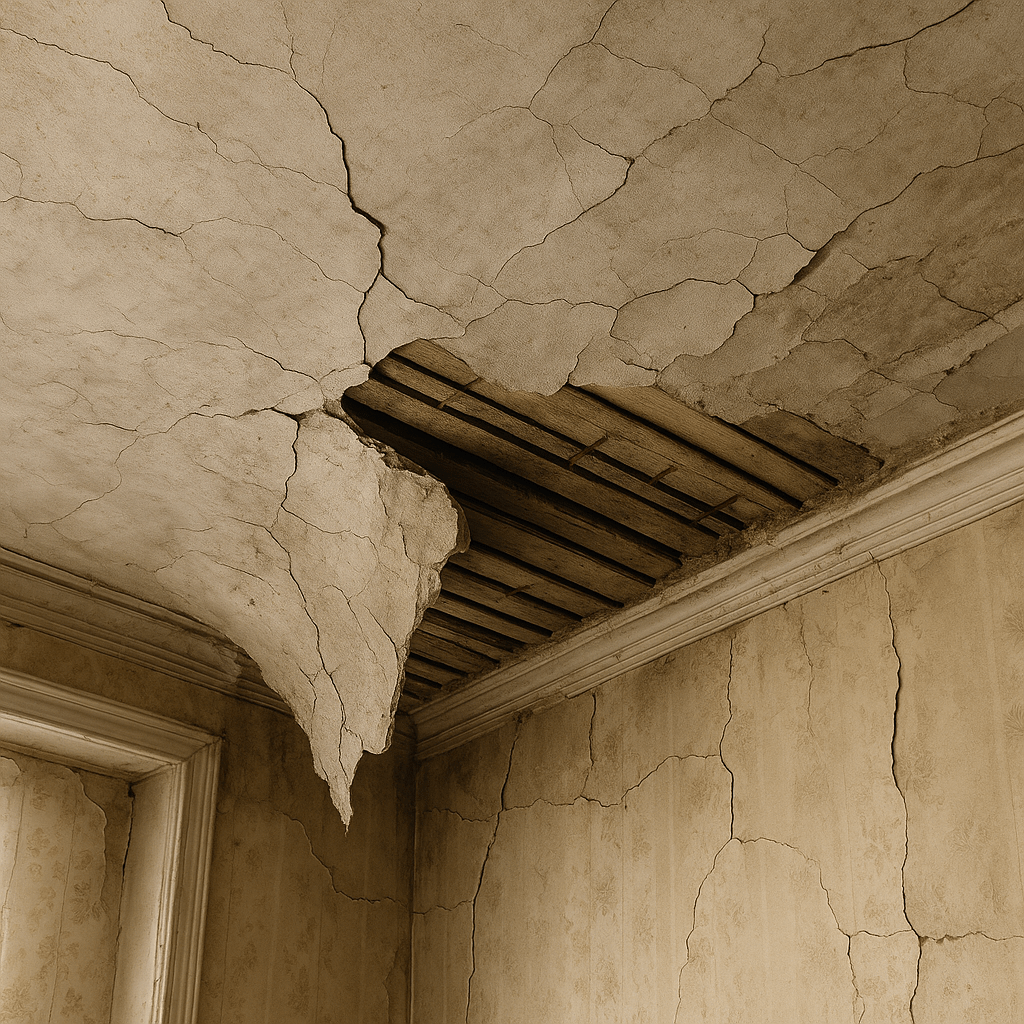
Old fasteners, often forged nails, oxidize and lose their effectiveness over time. In some extreme cases, only a thin layer of wallpaper still holds the entire ceiling together! Surface ripples and irregularities then become visible, revealing the instability of this structure, which has become sensitive to vibrations.
Assess the condition of your plasterboard ceiling before any work
Before starting the renovation of a plasterboard ceiling, a complete diagnosis is essential. Start with a thorough visual examination to identify cracks, moisture, or deformed areas. You can gently tap the surface to detect unstable areas—a hollow sound usually indicates a separation between the plaster and the wooden slats.
Locating the joists is essential for future fastenings. To do this, use a stud finder or identify visible nail alignments. Before any work, it's essential to address any moisture issues and potential leaks. If you notice any particularly fragile areas, don't hesitate to stabilize them or remove them completely.
Here are the steps to assess the condition of your plasterboard ceiling before any work:
- Examine the surface carefully for cracks and wet areas
- Tap gently to identify loose parts (hollow sound)
- Locate and mark the location of the joists for future fixings
- Prioritizes moisture and infiltration problems
- Remove all items attached to the ceiling (lights, detectors)
Technical solutions for renovating a lath ceiling
Installation of a false ceiling on a metal frame
There creation of a suspended metal frame is the most versatile solution for renovate a plasterboard ceilinge. This technique adapts to all states of deterioration and allows for the easy integration of a layer of thermal and acoustic insulation. The rail structure fixed to the existing walls and/or ceiling also offers the advantage of installing modern recessed lighting.
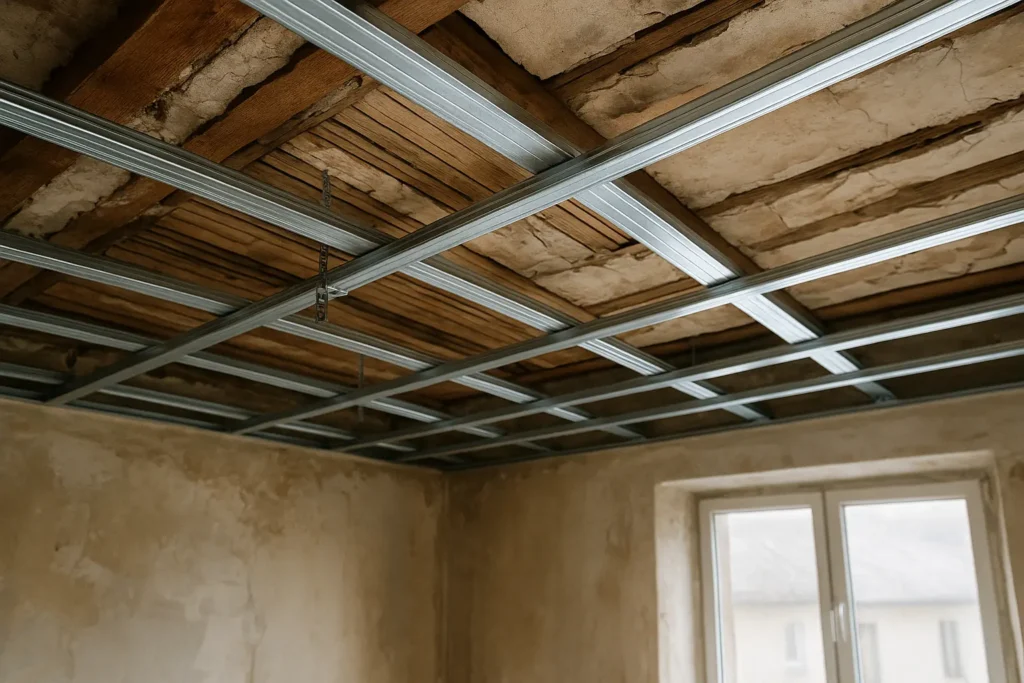
The main drawback remains the loss of ceiling height (usually 10 to 15 cm), but this system guarantees a perfect finish, masking all irregularities. This technique also significantly improves the acoustic performance of the room.
Installation of a stretch ceiling
To preserve maximum ceiling height, the PVC or textile membrane system is an interesting alternative. Attached to a perimeter rail, this technique requires only 3 to 5 cm of space. It adapts perfectly to the irregular surfaces of old ceilings and creates an impeccably smooth finish for replace a plasterboard ceiling.
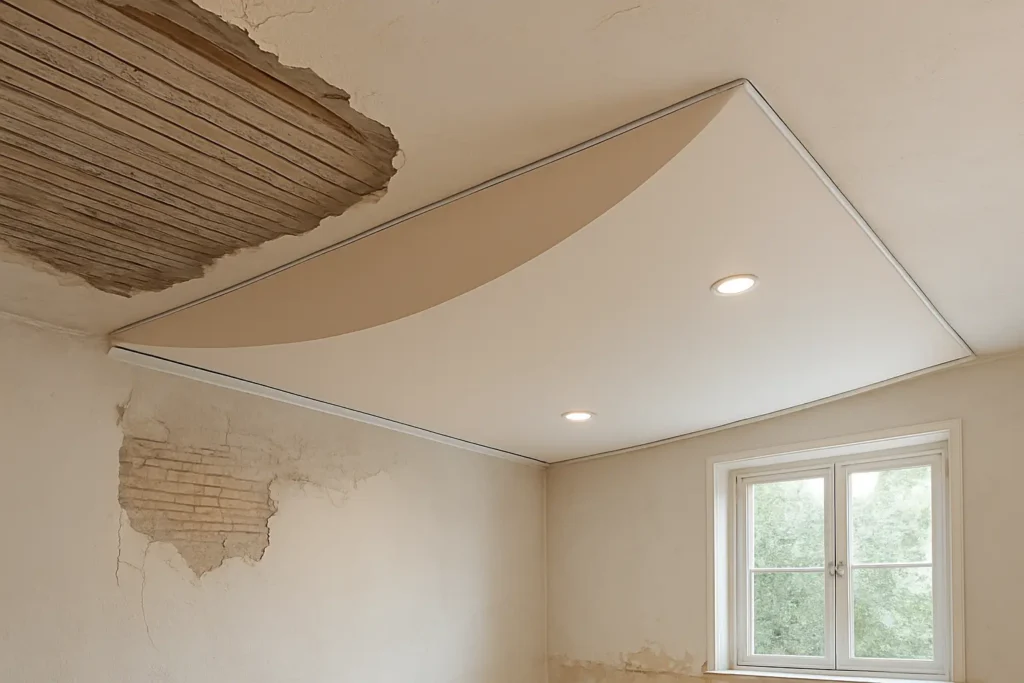
This quick installation (carried out by professionals) is an ideal solution for spaces with limited height. It also allows for the integration of spotlights and even lighting systems that are invisible when turned off.
Direct dressing and traditional restoration
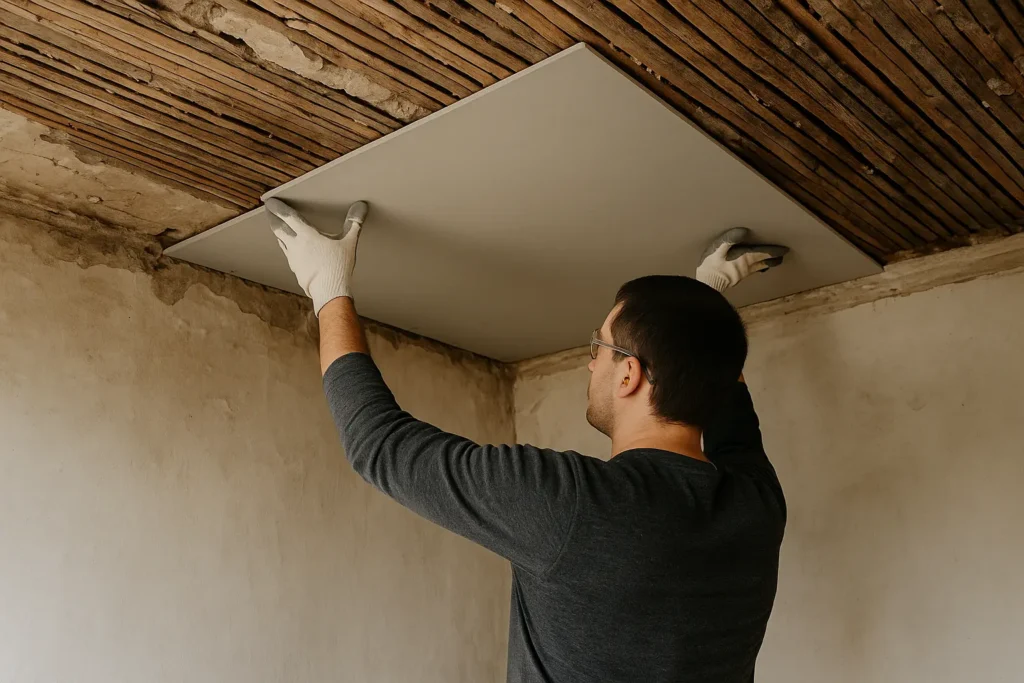
Direct cladding involves screwing plasterboard directly onto the existing lath. This method is only suitable if the original ceiling is stable. The long screws pass through the lath to anchor securely into the joists, thus maintaining maximum ceiling height.
| Technique for renovating a plasterboard ceiling | Loss of height | Difficulty level | Main advantages |
|---|---|---|---|
| Metal frame | 10-15 cm | AVERAGE | Versatility, insulation, recessed spotlights |
| Stretch ceiling | 3-5 cm | Professional | Speed, perfect finish |
| Direct dressing | 2-3 cm | Pupil | Height preserved |
| Traditional restoration | 0 cm | Expert | Preserving authenticity |
Step-by-step installation guide for a false ceiling on laths
Preparation and installation of the framework
The success of your project begins with accurately marking the level of your new ceiling on all walls. Use a laser level to ensure perfect horizontality. Then, carefully follow this line to secure the perimeter rails (UD). These elements will form the foundation of your entire structure.
Install the hangers approximately every 120 cm, ensuring they pass through the lath to anchor securely in the joists. These fasteners will support the entire weight of your new ceiling. Next, install the furring strips (CD) perpendicular to the joists, spaced no more than 50 to 60 cm apart. Reinforce this frame with perpendicular spacers every 120 cm to create a perfectly stable structure.
Insulation and installation of plasterboard
Insulation is a crucial step in improving thermal and acoustic comfort. Place the insulation between the furring strips, opting for a thickness of at least 10 cm. Choose high-performance materials that will optimize sound and thermal absorption.
- Screw the plasterboards perpendicular to the furring strips, in a staggered pattern.
- Carefully treat the joints between plates with coating and specific tape
- Applies a finishing coat over the entire surface for a uniform finish
Necessary materials and practical advice for renovating your plasterboard ceiling
List of essential materials and tools
To carry out a renovation of a plasterboard ceiling, plan all the necessary equipment:
- peripheral rails
- furs
- hangers adapted to the type of ceiling
- mounting brackets and spacers
When it comes to panels, choose standard models, waterproof ones for damp rooms, or soundproof ones for your needs. Here are the tools you should have with you:
- Laser level or long spirit level, tape measure and chalk line
- Drill with suitable bits, electric screwdriver and special plasterboard cutter
- Handsaw or hole saw for cutting, plaster rasp and plastering knives
Budget, timing and pro tips for a lath ceiling
Budget-wise, budget between €40 and €60/m² for supplies for a false ceiling on a metal frame with insulation. A skilled DIYer can complete this project in 2-3 days for a standard 20 m² room. For recessed spotlights, don't forget to install suitable thermal protection.
Choose paper joint strips over fiberglass for better crack resistance. In damp rooms like bathrooms, be sure to use waterproof panels and ensure optimal ventilation in the space between the two ceilings. Finally, don't hesitate to play with levels to create original decorative effects that will enhance your interior while preserving the authentic character of these old materials.